What is Vak Store?
Vak Store (Finnish Small Fox Trading Company — FSFTC) is a player-run
trading hub for the Vintage Story game server TOPS (The Official Public Server).
It provides three main services:
- Main Store — buy and sell common in-game items at fluid prices using EW currency.
- OCM (Open Commodities Market) — a player-to-player marketplace where anyone can list items at their own prices.
- Price Tracking & Statistics — daily charts showing price history, trade velocity, and currency health.
No real-world money is involved. All prices refer to in-game items only.
The store is physically located near coordinates 300, 100 on the TOPS server.
What is EW (Exchange Weight)?
EW (Exchange Weight) is the store's internal trade currency.
It is not a physical item in the game — it is a number stored in your account
that represents trading value you have accumulated.
- You earn EW by selling items to the store (store BUY orders).
- You spend EW by buying items from the store (store SELL orders) or trading on the OCM.
- You can also send EW directly to another player as a payment.
EW is designed to be fully liquid — you can trade almost any item for EW and
use that EW to buy almost any other item the store carries. It avoids the inflation
problems of the in-game currency (RG) because no automatic "money printer" exists for it.
Tip: EW is designed primarily as a medium of exchange rather than a long-term store of value. Players are encouraged to use EW for trading rather than accumulating large balances.
The store recommends bringing goods worth roughly what you plan to buy, rather than building up a large
EW balance. That said, many players do keep a balance for convenience.
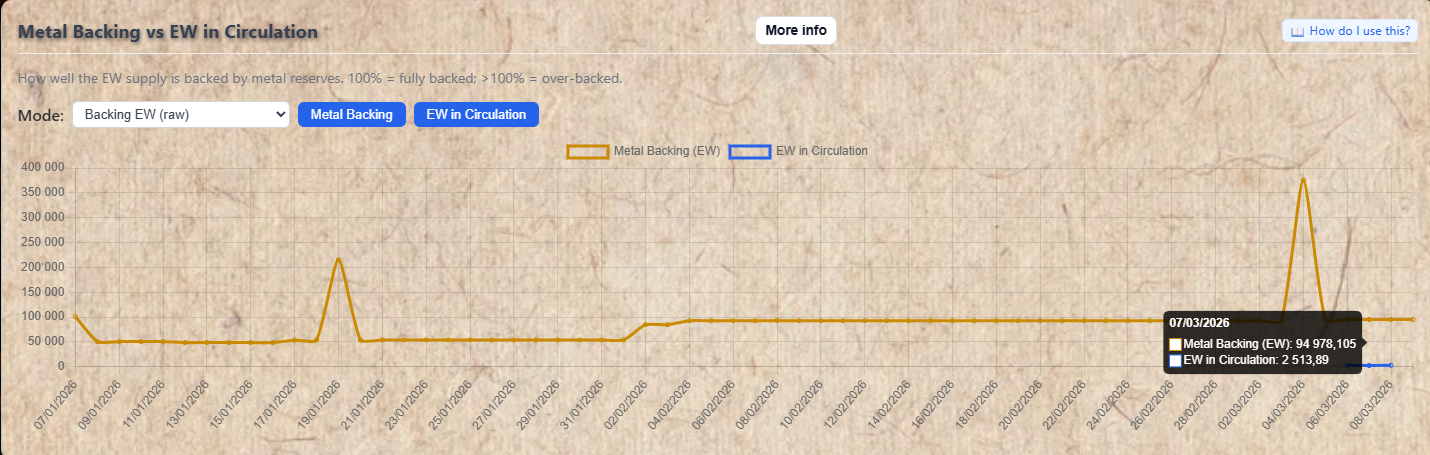
When the store has sufficient metal reserves, EW is backed by real in-game metals.
You can convert your EW balance into physical metals via the EW Insurance system.
How the Account System Works
Your account is tied to your Google account. Login is done via Google Sign-In
— no password is needed. Once logged in your EW balance and trade history are linked
to your account automatically.
Each account has:
- Player Name — your display name on the site and leaderboards.
- Mailbox address — your in-game deposit box location (e.g.
4A / 1A / F1).
The admin uses this to deliver items or collect payments in-game.
- EW Balance — your current trading credit, shown in the top bar after login.
Admin step: All store transactions (buying/selling items) go through
the admin. You build a cart on the website and submit a request — the admin then
processes it in-game and your balance updates. This is intentional: it allows the store
to handle any item type even without a direct in-game market system.
Getting Started — First Time Setup
- Click Login in the top bar (or the Google Sign-In button on any page). Sign in with your Google account.
- After login, click Settings in the top bar. Set your Player Name (your in-game username) and your Mailbox address.
- Once your mailbox is set, you are ready to trade. Go to the Main Store page to browse prices and build your first cart.
- When your cart is ready, click Submit Purchase Request. The admin will process your request and items/EW will be exchanged via your deposit box.
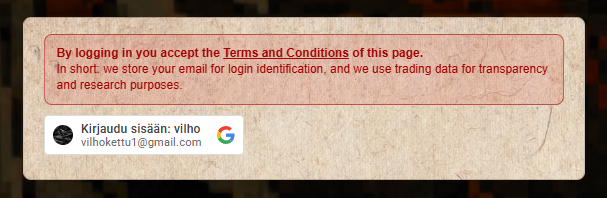
The login panel — click the Google button to sign in with your Google account.

After login your player name and EW balance appear in the top bar.
Use the navigation buttons in the top bar to move between pages at any time. This instructions page is always accessible via the Instructions button in the top bar.
Overview
The Main Store page is your primary tool for trading with the store.
You build a shopping cart of items to buy and/or sell, then submit a request.
The admin processes it and your EW balance is updated.
The page also contains useful calculators (Quick Calculator, Pay With, Item Converter)
that help you plan trades before committing.
Section Navigation Panel
On the left side of the Main Store page is a collapsible Sections panel.
It lists every tool section on the page. Click any button to jump directly to that section.
On mobile it collapses to a floating ☰ Sections button at the bottom of the screen.
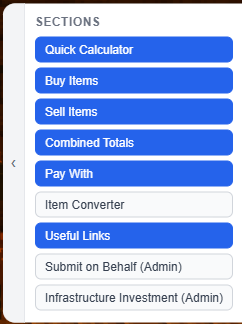
The Sections panel on the left — click any button to jump to that part of the page.
Display Currency
At the top of the page is a Display Currency dropdown. By default all
prices are shown in EW. You can type any item name (e.g. "Copper Ingot")
to see all prices converted to that item's equivalent value instead.
This is useful if you want to know "how many copper ingots is this item worth?" without manually calculating.

The Display Currency selector. Change it to any item to see all prices in that item's value.
Send EW — Direct Player Transfer
Next to the Display Currency selector is the Send EW button.
Use this to transfer EW directly from your balance to another player's account.
How to send EW:
- Click Send EW.
- Type the target player's exact player name. Suggestions will appear as you type.
- Enter the amount (minimum 0.01 EW).
- Optionally add a note/memo for your own records.
- Click Send.
No fees apply to direct player transfers. The full amount is credited to the recipient immediately.
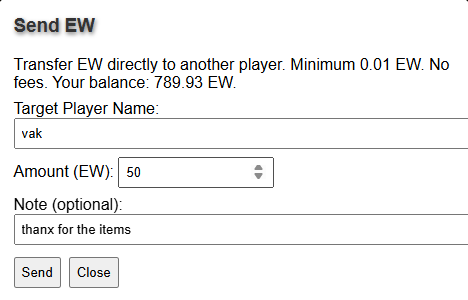
The Send EW modal. Enter the recipient's exact player name and the amount to send.
Quick Calculator
The Quick Individual Item Calculator is a fast way to look up the buy and sell price
for a single item without adding it to your cart.
- Full Stack Item — select an item that is sold in stacks. Enter how many stacks. Click Calculate Stack. The result shows the total buy price (what you pay) and sell price (what you earn).
- Individual Item — same but counts individual pieces instead of full stacks.
This does not add anything to your cart — it is a reference calculator only.

Quick Calculator result — shows buy price (what you pay) and sell price (what you earn) for the selected item and quantity.
Buy Items — Building Your Buy Cart
The Buy Multiple Items section is where you add items you want to
purchase from the store. Each item you add will be removed from the store's stock when your request is approved.
Full Stacks: Select an item from the dropdown, set the quantity (in stacks), and click Add Stack.
Individual Items: Same but quantity is in individual pieces instead of stacks.
OCM Listings (Buy): Expand this section to search OCM marketplace listings and add them to your buy calculation. This is for reference/calculation — OCM trades are handled separately on the OCM pages.
Account Balance: Enter your current EW balance and click + Add Balance. This includes your balance in the Combined Totals calculation.
Custom Inputs (advanced): For items not in the main dropdown — you can enter a custom item name and price manually. Useful for special or unlisted items.
Each added item appears in the list below with its name, quantity, and EW price. Click × on any row to remove it.
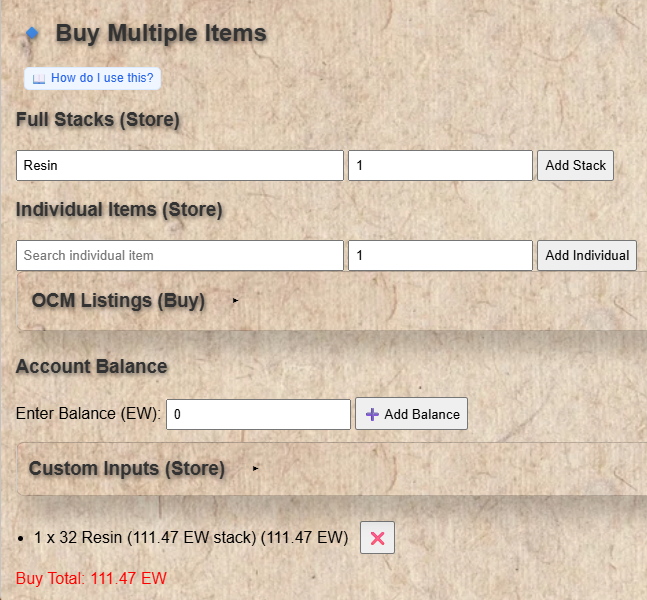
Adding an item to the buy cart. The item appears in the list below with its quantity and price.
Sell Items — Building Your Sell Cart
The Sell Multiple Items section works identically to the Buy section,
but for items you want to sell to the store.
When your request is approved, the store receives your items and your balance increases.
The layout is the same: Full Stacks, Individual Items, OCM Listings, Account Balance, and Custom Inputs.
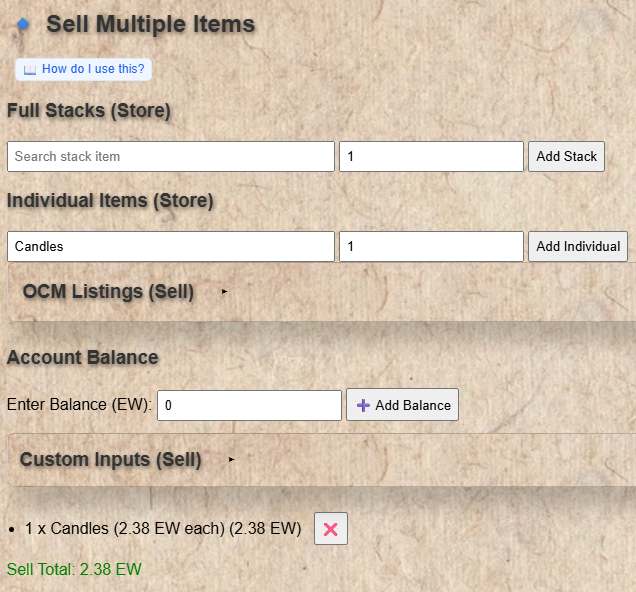
Adding an individual item to the sell cart. The sell total updates automatically.
Combined Totals
The Combined Totals section shows the overall financial picture of your current cart:
- Account Balance — your current EW balance (if you added it to the buy or sell section).
- Net Balance — the difference between your sell total and your buy total.
- Positive (green) = you receive this much EW from the transaction.
- Negative (red) = you owe this much EW to complete the transaction.
- Account Balance After Transaction — a projection of what your balance will be after the request is approved (Account Balance + Net Balance).
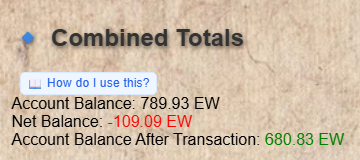
Combined Totals: Net Balance shows how much EW you will gain or owe. Account Balance After shows your projected balance.
Pay With — Cover a Deficit with Items
When your Net Balance is negative (you owe EW), the Pay With
tool lets you cover that deficit by including extra items in your sell cart as payment —
instead of needing a pre-existing EW balance.
Example Scenario
You want to buy 2 stacks of Steel Ingots (costs 400 EW) but your balance is only 200 EW.
You have plenty of Copper Ingots to spare. Add Copper Ingots to Pay With,
set it to 100%, click Calculate — the tool tells you exactly how many Copper Ingots
to include in your sell cart to cover the 200 EW deficit.
How to use Pay With:
- Build your buy and sell carts normally. Observe the negative Net Balance.
- In the Pay With section, click + Add Item and select the item you want to pay with.
- Set a percentage for how much of the deficit that item covers (e.g. 100% = covers everything).
- Use the % Preset dropdown for quick setups:
Default 100% = the first item covers 100% of the deficit.
Equalizer = splits the deficit equally across all added items.
- Click Calculate Payment. The result shows exactly how many of each item to add to your sell cart.
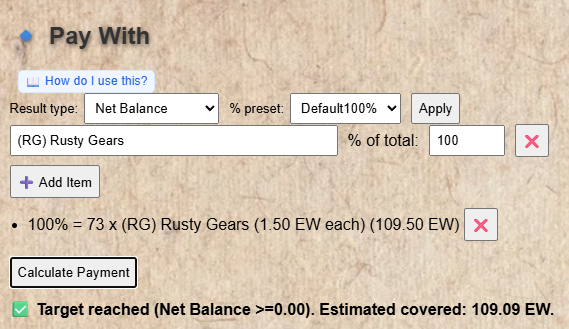
Pay With in action — the result tells you exactly how many items to add to your sell cart to cover the deficit.
Result type: The dropdown at the top of Pay With lets you choose whether to base the calculation on
your Net Balance or your full Account Balance. Net Balance is the default and most common choice.
Item Converter — Spend Your Positive Balance on Items
When your Net Balance is positive (you have EW coming in),
the Item Converter helps you decide which items to take instead of
keeping the EW in your account.
Example Scenario
You're selling a large batch of items and will receive 500 EW. You don't need EW —
you'd rather take Copper Ingots (50%) and Iron Ingots (50%) as payment instead.
Add both items to the Converter, set 50%/50%, click Convert Balance —
the tool tells you how many of each item to add to your buy cart to spend your incoming EW.
How to use Item Converter:
- Build your sell cart so you have a positive Net Balance.
- In the Item Converter section, click + Add Item and select items you want to receive.
- Set the percentage allocation for each item (they don't need to total 100% — any unallocated % stays as EW).
- Use the % Preset for quick setups (same as Pay With).
- Click Convert Balance. The result shows how many of each item to add to your buy cart.
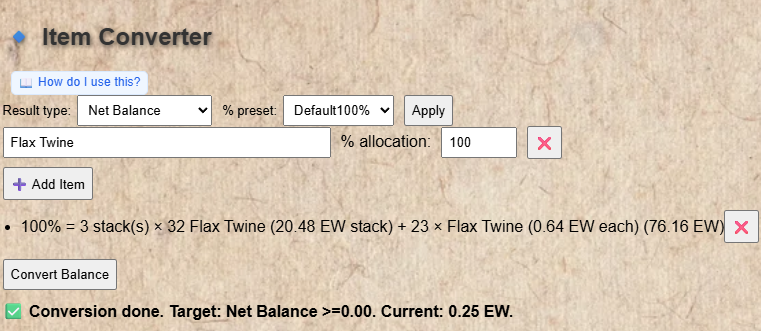
Item Converter splitting 500 EW 50/50 between two items — the result shows how many of each to add to your buy cart.
Transaction Request — Submitting Your Trade
Once your buy and/or sell carts are ready, use the Transaction Request
section to submit your trade to the admin.
The full process:
- Build your carts in the Buy and Sell sections above.
- Check the Combined Totals to confirm the net balance looks correct.
- Click Submit Purchase Request.
- Your request is sent to the admin queue.
- The admin processes your request: they collect items from / deliver items to your in-game deposit box.
- Your EW balance is updated automatically on approval. You can see it in Account History.
Admin step: After submitting, your request enters a queue. The admin
will review and approve or deny it. Processing time varies. Once approved your balance
updates and the transaction appears in your Account History.
Other buttons in this section:
- Copy Transaction Data — copies your current cart as text. Use this to share your cart or save a backup.
- Import Transaction Data — paste or upload a previously copied cart to restore it.
- Clear Carts — removes all items from both buy and sell lists. Use with caution.

Click Submit Purchase Request to send your cart to the admin for processing.
What is OCM?
OCM (Open Commodities Market) is the player-to-player trading marketplace.
Unlike the Main Store (where you trade with the store itself), OCM lets players list
items at their own prices and trade directly with each other.
- Merchants list items as SELL (they are selling) or BUY (they want to buy).
- Customers browse listings and submit trade requests.
- The merchant keeps 90% of the trade value — a 10% fee goes to the store admin.
- Payment can be in EW or in another in-game item (a "peg item") if the merchant allows it.
Login is required to view listings and place trades.
Filters — Finding What You Need
The filter panel at the top of the page helps you narrow down the listings:
- Listing type — SELL = merchants offering items for sale. BUY = merchants looking to buy items.
- Item name — type part of an item name to filter by it (click Search to apply).
- Name — filter by merchant name (click Search to apply).
- Only item-payment listings — show only listings that let you pay with an item instead of EW.
- Stock min / max — filter by how many individual units are available (applies immediately).
- Sort — sort by EW price ascending or descending (applies immediately).
- Accepted payment pegs — filter to only show listings that accept specific peg items as payment (click Search to apply).
- Page size — how many listings to show per page.
Click Search to apply name/type/peg filters. Sort and stock filters apply instantly. Click Reset to clear all filters.
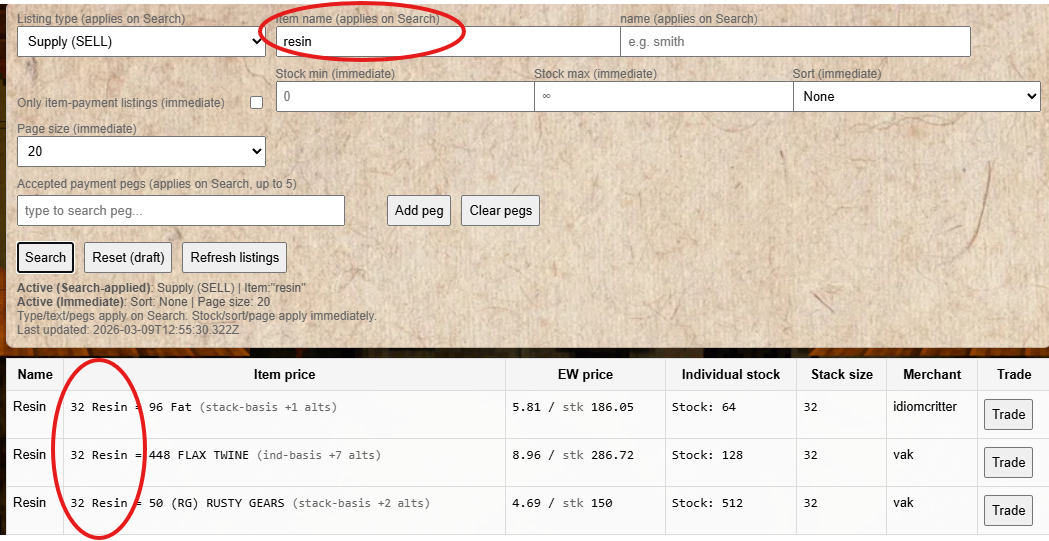
The filter panel — use these controls to narrow down the listings to what you're looking for.
Reading the Listings Table
Each row in the listings table represents one active listing. The columns are:
- Name — the item being traded.
- Item price — the price expressed in the peg item (e.g. "5 Iron Ingots per stack"). Only shown if the listing accepts item payment.
- EW price — the equivalent EW value of the trade (the canonical price).
- Individual stock — how many individual units the merchant currently has available.
- Stack size — how items are grouped in one "stack" for this listing.
- Merchant — who is selling or buying.
- Trade — click this button to begin a trade request for this listing.
The listings table — each row is one active OCM listing. Click Trade to submit a trade request.
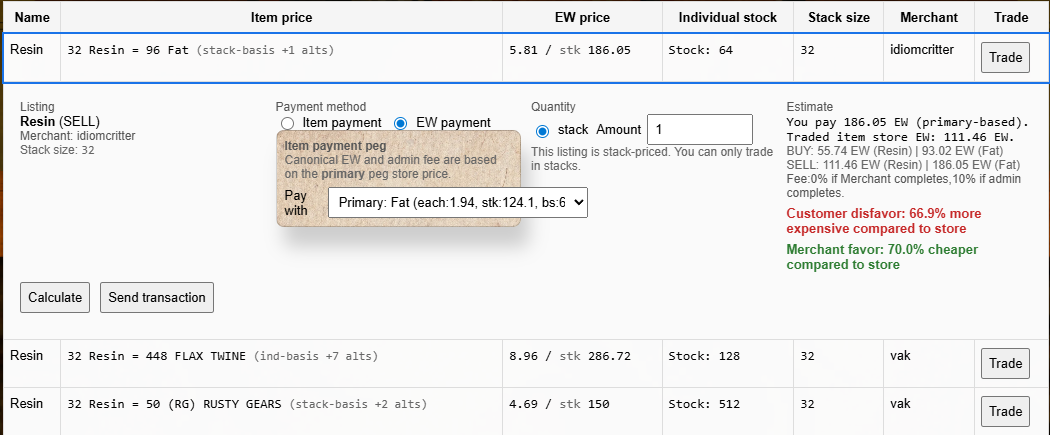
Making a Trade Request
- Find a listing you want to trade on and click Trade.
- Choose your quantity — either in individual units or in stacks.
- Choose your payment method — EW (deducted from your balance) or Item (you deliver a peg item to the merchant's mailbox).
- If paying with an item, select which peg item to use from the dropdown.
- Review the estimate shown (total EW equivalent).
- Click Confirm to submit the trade request.
Admin step: After you submit a trade request, it goes to the merchant
as a pending request. The merchant (or admin) must accept it for the trade to complete.
You can see your pending trades in the "My pending trades" section below the listings.
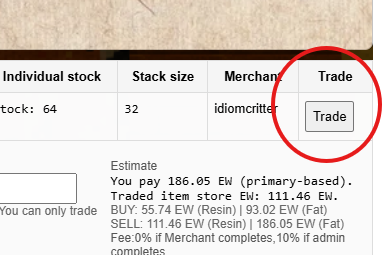
Click the Trade button on any listing to begin a trade request.
My Pending Trades
Below the listings table is the My pending trades section.
This shows all trade requests you have submitted that are still waiting for the merchant to accept.
Columns: TradeId, Item, Merchant, Qty, Payment, Total (EW eq.), Status, Actions, Edit.
- Cancel button — cancels the pending trade request. Use this if you change your mind.
- Edit button — opens the edit dialog to change the quantity or payment method.

Your pending trades — trades you've submitted that are waiting for the merchant to accept.
Editing a Pending Trade
You can edit a pending trade before the merchant accepts it. Click Edit
on a pending trade to open the edit dialog.
In the edit dialog you can change:
- The quantity (individual or stack mode, and the number).
- The payment method (EW or item peg).
- Which peg item to use for payment.
The updated estimate is shown live. Click Save edit to submit the change.
Note: Saving an edit cancels the original trade and creates a new one with a new TradeId. The merchant will see the updated request.
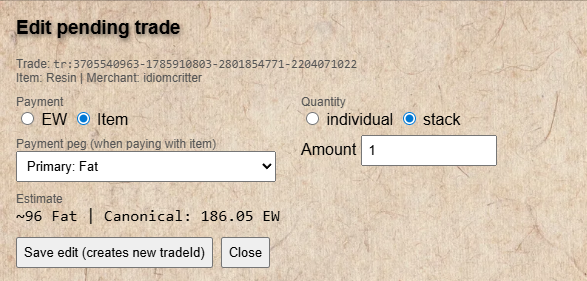
The edit trade dialog — change quantity or payment method before the merchant accepts.
Overview
The OCM Merchant page is for players who want to list items for
sale or purchase on the OCM marketplace. Here you create and manage your own listings
and respond to incoming trade requests from customers.
You are the Merchant on this page. You set the prices and quantities. Login is required.
Creating a Listing — Store Search (Recommended)
The Store search tab is the recommended way to create a listing for any item that the main store carries.
- Select the listing Type: SELL (you are selling) or BUY (you want to buy from customers).
- Search for and select the store catalog item you want to list. The stack size is set automatically to match the store's catalog.
- Set the quantity available (in individual units or stacks).
- Configure your pricing peg (see Pegs section below).
- Click Create store listing.
Admin step: Your new listing is placed in PENDING_REVIEW status.
An admin must approve it before it becomes publicly visible on the marketplace.
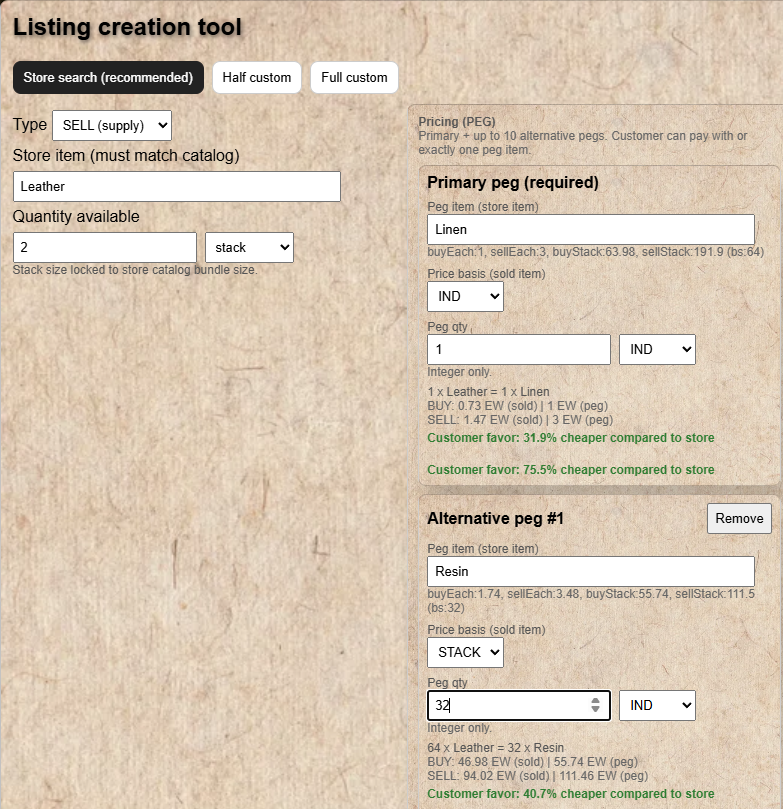
The Store Search tab — select a catalog item, set quantity, configure the peg, and create.
Creating a Listing — Half Custom
Use the Half custom tab for items that are not in the store catalog, but where you still want to price the listing using a catalog item as the peg.
- Enter a custom item name (letters and spaces only).
- Set the stack size manually.
- Set quantity and peg as normal.
Customers can pay with EW or with the peg item, same as a Store listing.
Creating a Listing — Full Custom
Use the Full custom tab for items with no catalog reference and where you want to set a fixed EW price directly.
- Enter a custom item name.
- Set stack size and quantity.
- Set a fixed EW price per individual unit.
Full custom listings only accept EW payment — no item peg option is available.
Understanding Pegs — How Pricing Works
A peg links your listing's price to a store catalog item's price.
Instead of setting a fixed EW number, you say "this item is worth X times the store
price of [another item]."
Example
You are listing Iron Ingots. You set the primary peg to "Copper Ingot" with a multiplier of 2×.
This means: 1 Iron Ingot costs as much as 2 Copper Ingots (at the store's current sell price).
If the store price of Copper Ingots changes, your listing's EW equivalent updates automatically.
You can add:
- One primary peg — the default pricing reference.
- Up to 10 alternative pegs — customers can choose to pay using any of these alternatives instead.
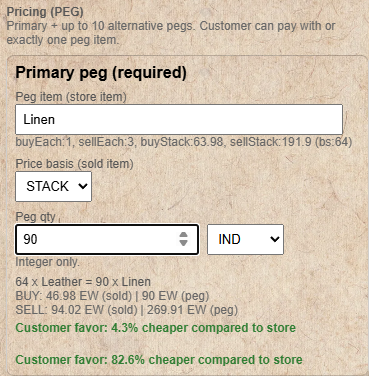
The peg configuration — select a catalog item and set the quantity ratio to define your listing's price.
Managing Your Listings
The My listings section shows all your current listings split into
SELL listings, BUY listings, and Pending review.
Listing statuses:
- ACTIVE — publicly visible, customers can trade.
- PAUSED — hidden from the public marketplace. Trade requests stop.
- PENDING_REVIEW — waiting for admin approval (new or edited listing).
- REJECTED — admin declined the listing. Edit and resubmit or delete.
- COMPLETED — all stock was traded. The listing is finished.
Actions available on each listing:
- Edit — change item details, pricing, or quantity. Puts listing back in PENDING_REVIEW.
- Restock — update the available quantity without changing other details.
- Pause / Resume — hide or show your listing without deleting it.
- Delete — permanently remove the listing.
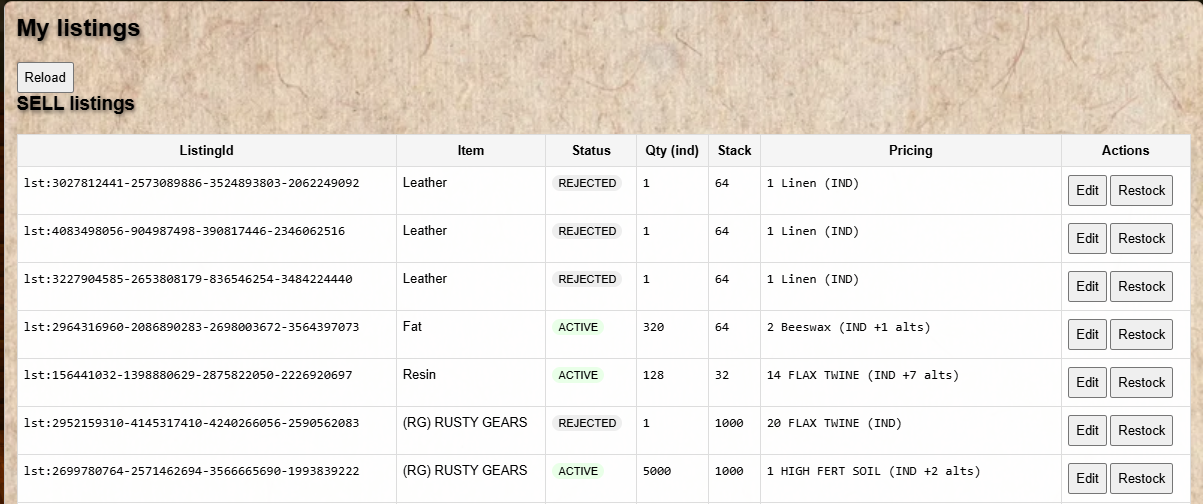
Your SELL listings — manage each listing with Edit, Restock, Pause, or Delete.
Handling Incoming Trade Requests
When a customer submits a trade against your listing, it appears in
Incoming pending requests (I am Merchant).
- Click Accept to complete the trade. The customer's balance (or item payment) is processed, and you receive the trade value minus the 10% admin fee.
- Click Deny to reject the trade request.
Admin step: The admin can also accept trades on your behalf if needed (e.g. if you are unavailable). The "Completed By" field in your trade history will show whether you or the admin accepted it.

Incoming trade requests — review each request and click Accept or Deny.
Overview
The Account History page shows a complete log of every balance change on your account —
every store transaction, EW transfer, and OCM trade. Login is required.
Two modes are available: Account history (store transactions) and OCM trades history.
Date & Page Filters
- From / To date pickers — narrow the history to a specific date range.
- Page size — how many rows to show per page (20 / 50 / 100 / 200 / 500).
- Load button — apply the filters and reload the table.
- Prev / Next buttons — page through the results.
Account History Columns
- Date — when the transaction was processed.
- TxId — unique transaction ID (for reference if you need to discuss a transaction with the admin).
- Type — what kind of transaction this was (see below).
- Delta EW — how much your balance changed. Positive = received EW. Negative = spent EW.
- Balance After — your balance immediately after this transaction completed.
- Details — click See details for a full breakdown.
The account history table — each row is one balance change event.
Transaction Types Explained
| Type | What it means |
|---|
| REQUEST_APPROVED | A store buy/sell request was processed and approved by admin. |
| TRANSFER_SENT | You sent EW to another player directly. |
| TRANSFER_RECEIVED | You received EW from another player. |
| ADMIN_ADJUST | An admin manually adjusted your balance (with a reason). |
| INSURANCE_DEPOSIT | EW was locked into an EW Insurance policy. |
| INSURANCE_WITHDRAW_PARTIAL | Some units were withdrawn from an insurance policy (EW credited back). |
| INSURANCE_WITHDRAW_ALL | All units withdrawn from a policy (EW credited back). |
"Submitted by" Field
Inside the See details panel for a REQUEST_APPROVED transaction,
you may see a Submitted by line:
- Submitted by: User — you submitted this request yourself via the website.
- Submitted by: Admin (on behalf of) — the admin entered this request for you (for example if you traded in person at the store and the admin processed it manually).

The "Submitted by" field tells you whether you or the admin submitted the request.
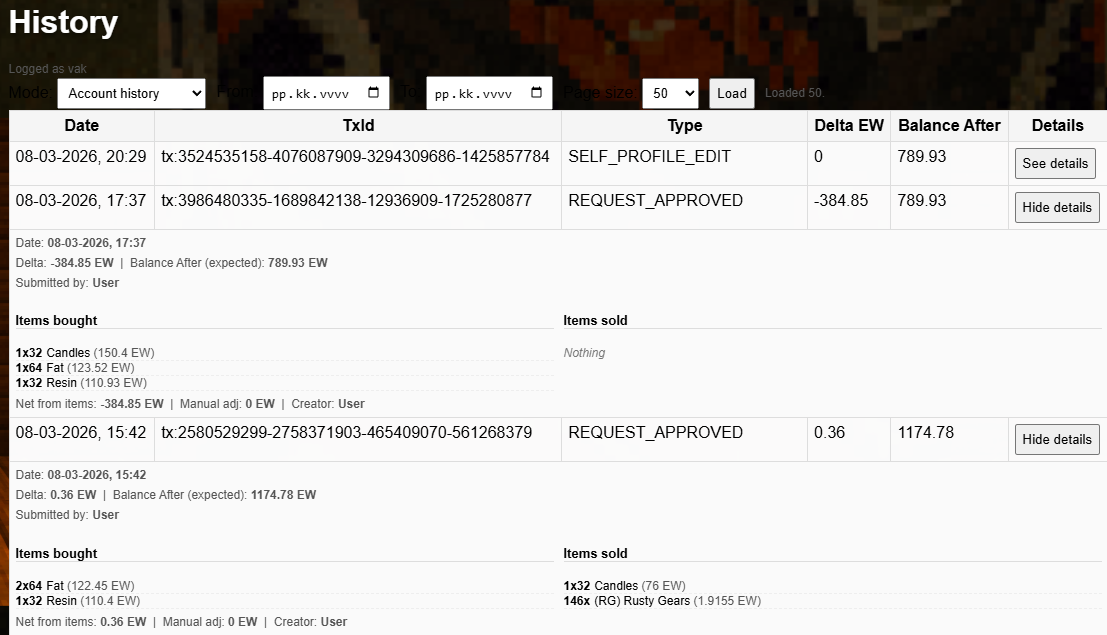
See Details — Full Transaction Breakdown
Click See details on any row to expand a panel with the full breakdown:
- Exact date and time of the transaction.
- Delta EW and your balance after.
- Items bought — list of items you purchased (with quantities and prices).
- Items sold — list of items you sold.
- Net from items and any manual adjustment applied by the admin.
- Who submitted the request.

The details panel — shows every item in the transaction, the net EW, and who submitted it.
OCM History Mode
Switch the Mode dropdown to OCM trades history to see your OCM trade log.
Columns: Date, TradeId, Trader (the other party), Completed By (merchant or admin), Total Value (EW), Details.
The details panel shows item name, quantity, payment method, canonical EW value, and both parties involved.
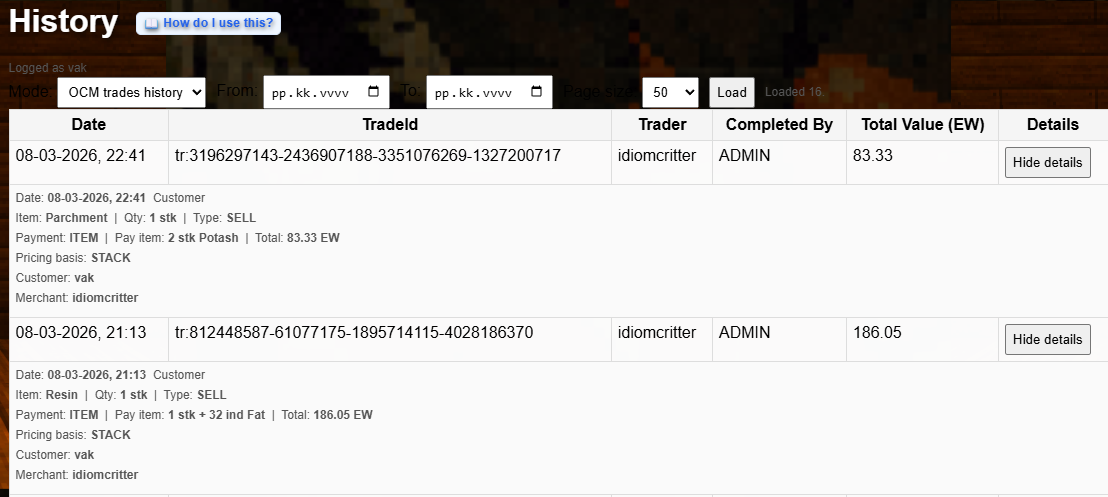
OCM history mode — shows your player-to-player trades with details about each transaction.
Username & Mailbox
Username (Player Name) — your display name on the website and leaderboards.
- Allowed characters: letters, numbers, spaces, underscore
_, and dash -.
- Length: 2 to 32 characters.
Mailbox — the in-game address of your deposit box where the admin delivers items and collects payments.
- Format:
4A / 1A / F1 (box number / row / floor number).
- This is required for trading. The admin uses it to find your box in-game.
Mall Mailbox (optional) — if you have a second deposit box inside the mall.
- Format:
M1A / M1A / F1.
- Leave empty if you don't have one.
Each field saves independently — click the Save button for each field you change.
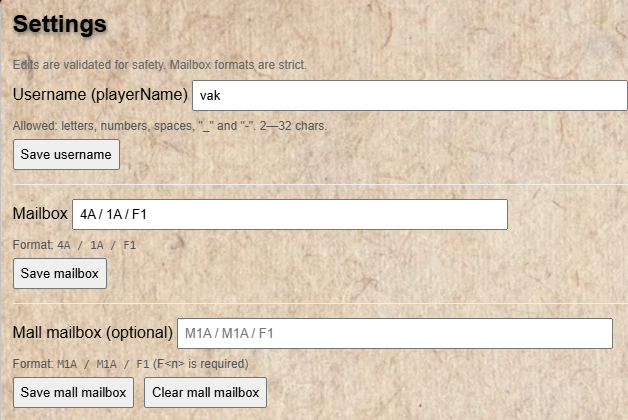
The Mailbox field — enter your in-game deposit box address in the exact format shown.
Leaderboard Consent
Choose whether and how you appear on the public leaderboards:
- Opted out (default) — you do not appear on any leaderboard.
- Half opt-in (anonymous) — you appear with a stable anonymous alias (e.g. "Anonymous #7"). Your real name is never shown.
- Full opt-in — your player name is shown publicly on leaderboards.
The leaderboard displays only these 8 statistics. Your email, mailbox, and mall mailbox are never visible on leaderboards.
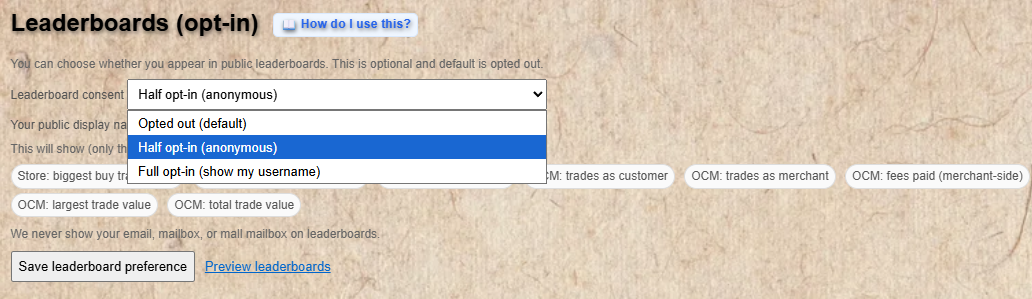
Choose your leaderboard visibility — anonymous, real name, or opt out entirely.
Statistics
The Statistics section shows your personal trading history aggregated into key metrics.
Stats are computed automatically overnight and are read-only on this page.
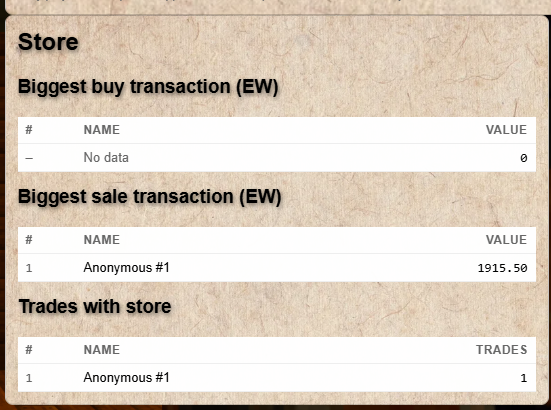
Store stats include: total trades with store, net EW, largest single buy/sell value, last interaction date, favorite items bought/sold.
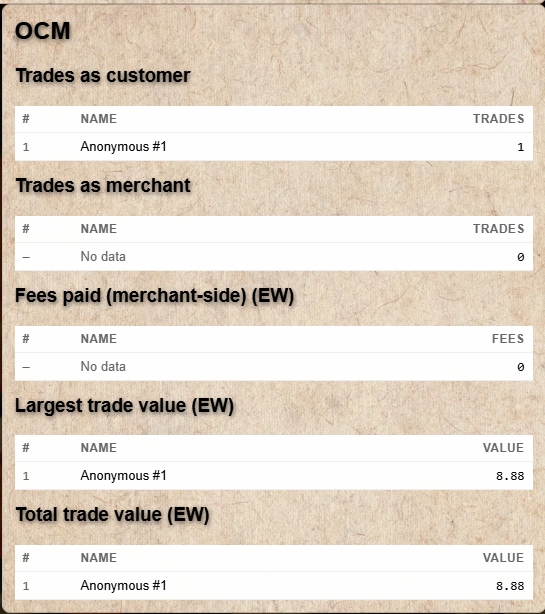
OCM stats include: total OCM trades, trades as customer vs merchant, total value traded, fees paid, largest trade, active listings, favorite counterparties and items.
Top5 shows your top 5 items by quantity, EW value, and trade count — both for the store and OCM.
Click Refresh statistics to check for updated data. The Last updated time shows when stats were last computed.
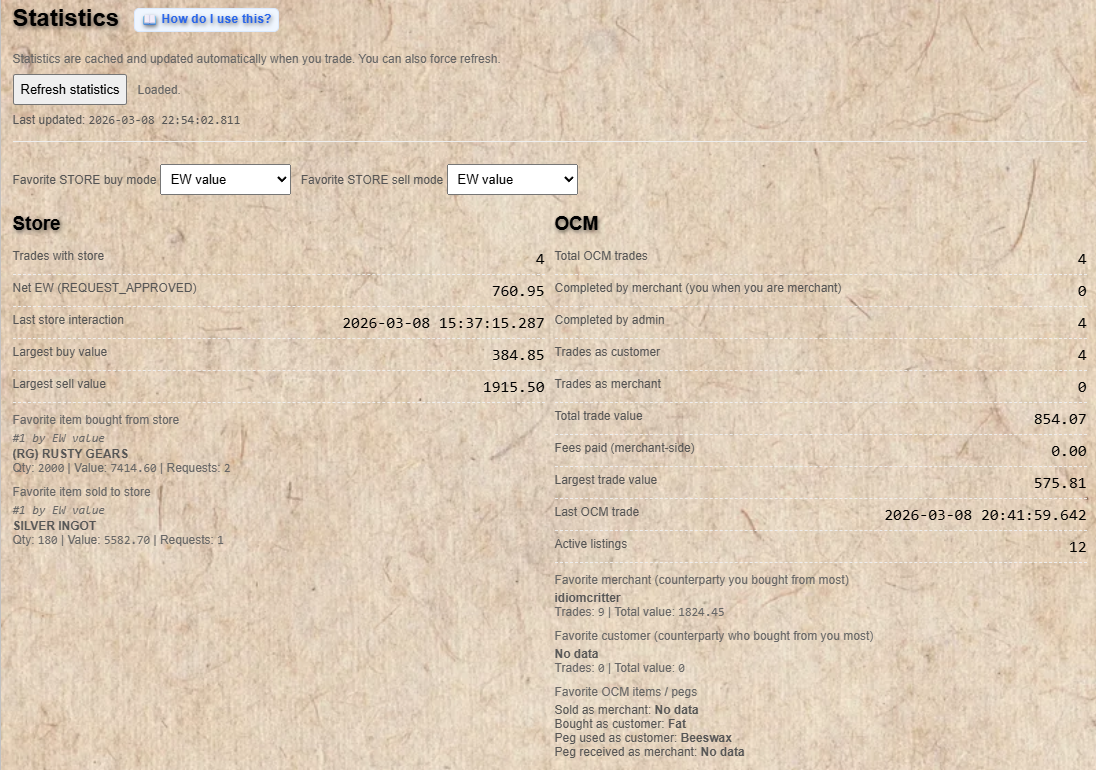
Your personal trading statistics — updated automatically overnight.
Delete Account
The Delete account section lets you remove your account from the system.
Deleting your account will:
- Remove your email address from the system.
- Keep all your trade data and history (for transparency and record-keeping purposes).
- Pause all your active OCM listings so they are no longer visible to others.
Your EW balance record remains in the system for historical accuracy. You will need to confirm deletion in a dialog before it takes effect.
What is EW Insurance?
EW Insurance lets you lock in the current sell-price value of your EW
as physical in-game metals. Instead of holding EW (which exists only as a number),
you convert it into a guaranteed reserve of real metals (ingots and nuggets)
held physically by the store admin.
- 1 insurance unit = 500 EW. You deposit in whole units only.
- Maximum 5 policies per account.
- All metal prices use the current SELL price at the time the admin approves your deposit.
- When you want your metals, the admin delivers them to your deposit box — or you can withdraw back to EW.
Admin step: Every change to an insurance policy (deposit, withdrawal, reallocation) requires admin approval. You submit a request and the admin processes it.
Policy Lifecycle
Create Policy
→
Set Allocation
→
Request Deposit
→
Admin Approves
→
Active
Active
→
Request Withdrawal
→
Admin Approves
→
EW credited / Metals delivered
Creating a Policy
- Click + Create New Policy.
- Give it a name (letters, numbers, and spaces; max 40 characters).
- Your new policy appears with status Empty.
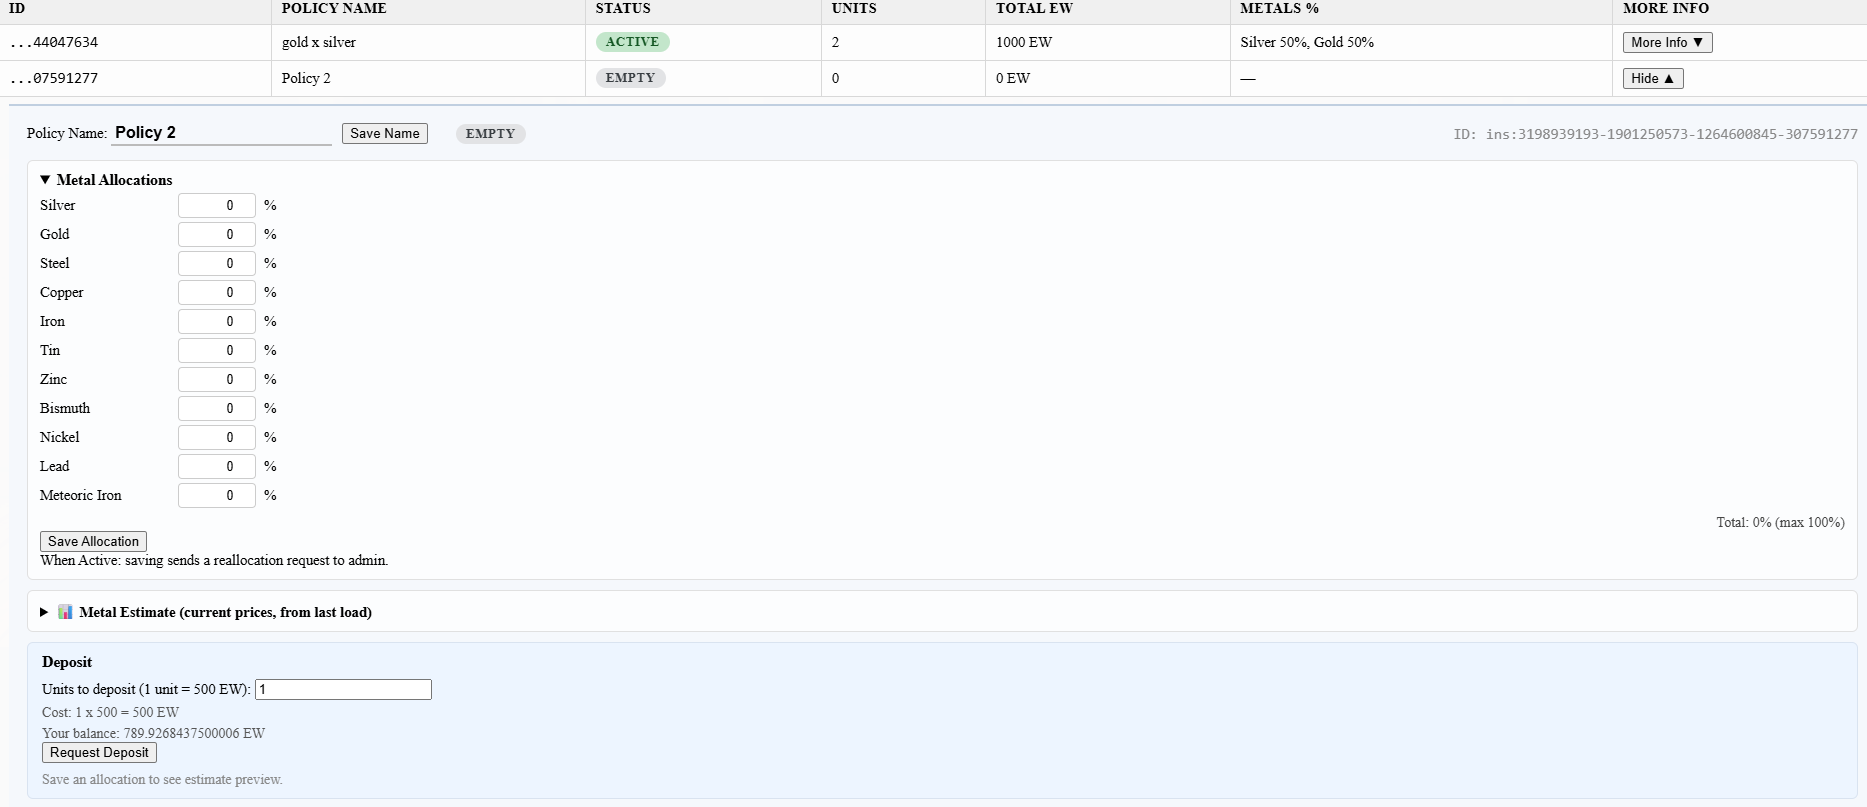
A newly created policy in Empty state — ready for allocation and deposit.
Setting Metal Allocation
Before depositing, set which metals you want your EW to be backed by and in what proportions.
Click Update Allocation on your policy. You can allocate to these metals:
Silver, Gold, Steel, Copper, Iron, Tin, Zinc, Bismuth, Nickel, Lead, Meteoric Iron
- Assign a percentage (0–100%) to each metal you want.
- Total percentages must be 100% or less. Any unallocated percentage remains as "uninsured EW".
- Steel is ingot-only — any EW remainder after whole steel ingots is listed as uninsured.
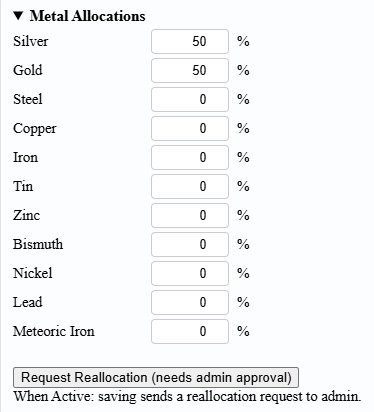
Set your metal allocation — choose which metals back your EW and in what percentage.
Depositing EW into a Policy
- Click Request Deposit on your policy.
- Enter the number of units to deposit (1 unit = 500 EW). Your current balance must cover the full cost.
- The policy status changes to Pending.
- The admin reviews and approves the request. Your EW balance is deducted and the metals are reserved at today's sell prices.
- Status changes to Active.
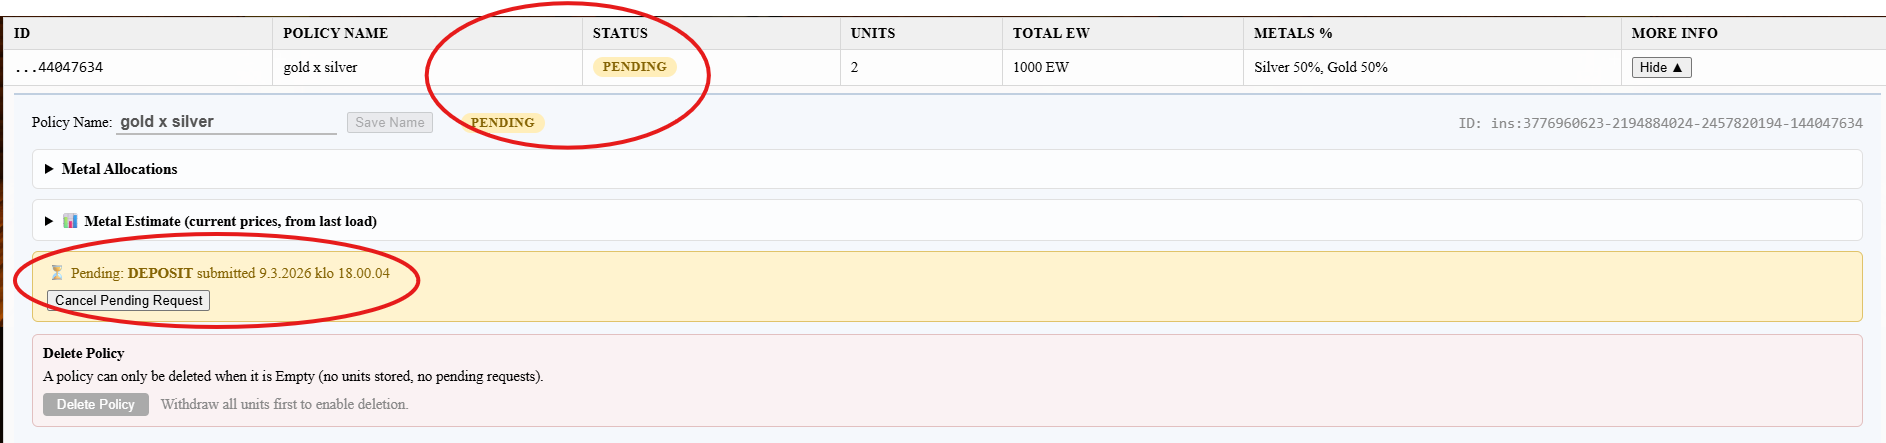
After requesting a deposit the policy shows Pending — awaiting admin approval.
Withdrawing from a Policy
You have two withdrawal options:
- Withdraw to EW — your deposited EW is credited back to your account balance (at the original EW value, not recalculated at current prices).
- Withdraw metals (physical) — the reserved ingots and nuggets are delivered to your in-game deposit box by the admin. Your EW balance is NOT credited — you receive the metals instead.
Both withdrawal types require admin approval. Submit the request and wait for the admin to process it.

An active policy — shows reserved units, projected metal quantities, and options to withdraw.
Overview
The Bank Dashboard is a public, read-only page showing the health and statistics
of the EW currency ecosystem. No login is required.
All data is updated once per day at midnight.
Use the Sections panel on the right side to jump to any chart.
Use the global Time Range dropdown at the top to change how much history all charts display.
EW in Circulation
Shows the total EW held by all active players combined, measured daily.
- Rising trend = more EW is being issued than destroyed (more buying activity).
- Falling trend = more EW is being spent/burned than issued (more selling activity or OCM fees).
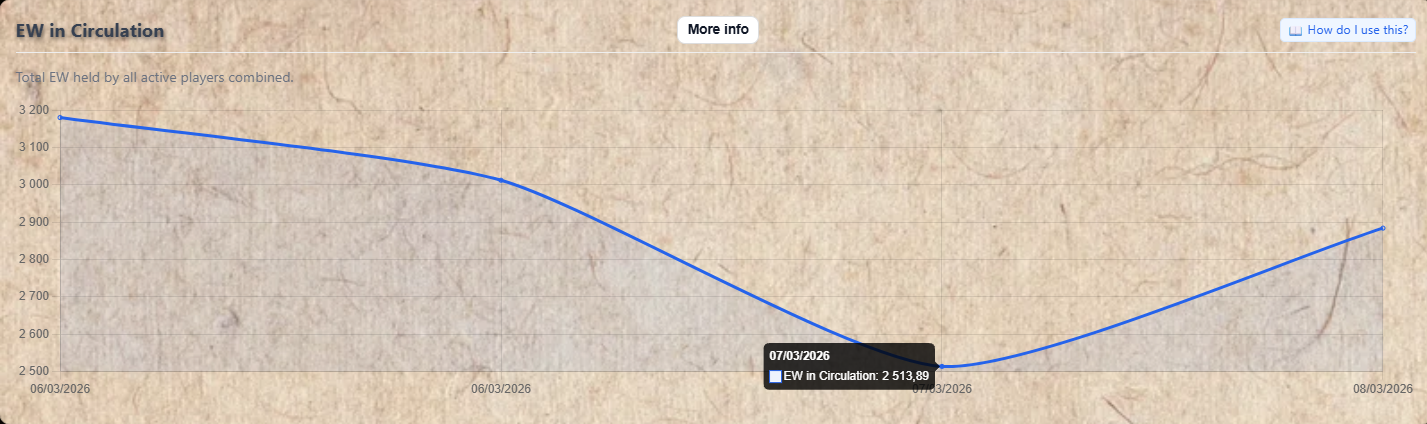
EW in Circulation — the total EW held by all players, tracked daily.
Currency Issuance & Destruction
Issuance = EW paid out by the store when it buys items from players.
Destruction = EW removed from the economy when players buy from the store, plus 10% OCM fees collected.
Toggle buttons let you switch between viewing: total destroyed, store buys only, OCM fees only, or the net EW change per day.
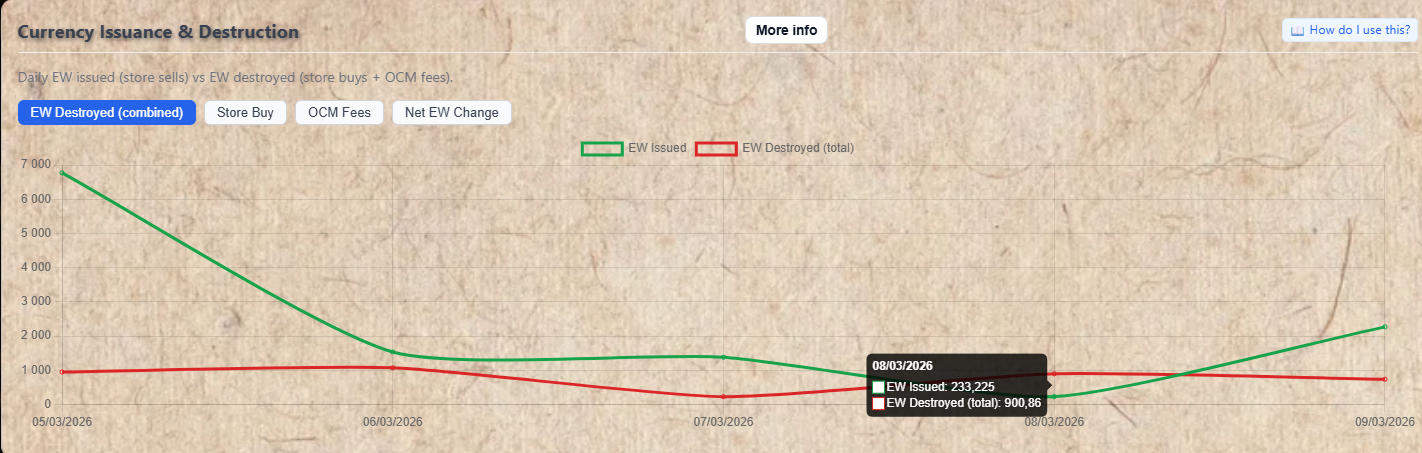
Daily EW issued vs destroyed — use the toggle buttons to isolate specific components.
Wealth Distribution
Shows how EW is distributed across the player base over time, split into four groups:
- ■ Top 1% — the wealthiest ~1% of players.
- ■ Next 9% — the next tier.
- ■ Next 20%
- ■ Bottom 70% — the majority of players.
Toggle between percentage view (what % of total EW each group holds) and raw EW view.
The donut chart below shows a snapshot for a specific date — use the date picker to choose which day.
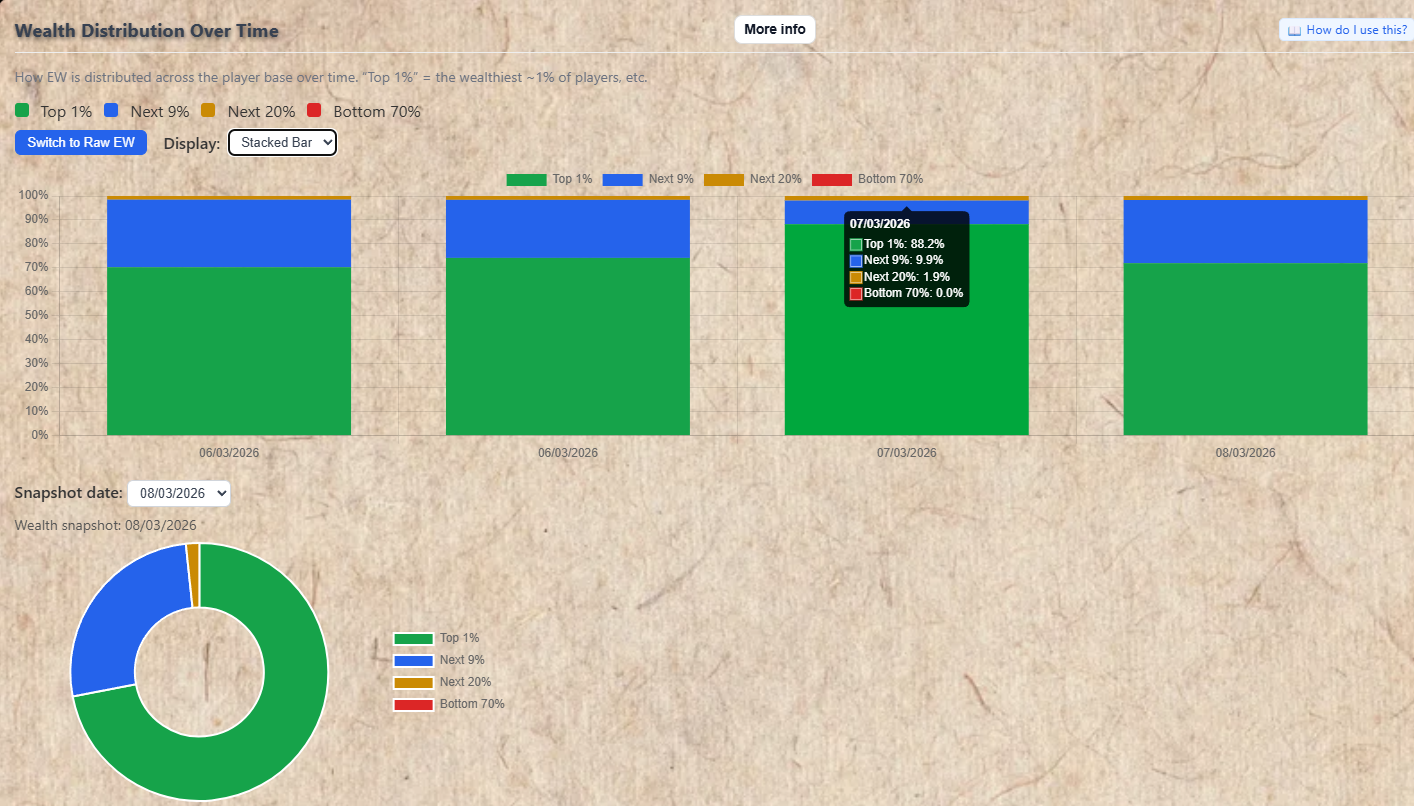
Wealth Distribution — how EW is spread across the player base over time.
Infrastructure Investments
A public log of items the admin has used for infrastructure purposes (buildings, systems, server infrastructure). These items were removed from store stock and invested into the server's physical setup.
Click More Info on any row to see the full description of what was built.
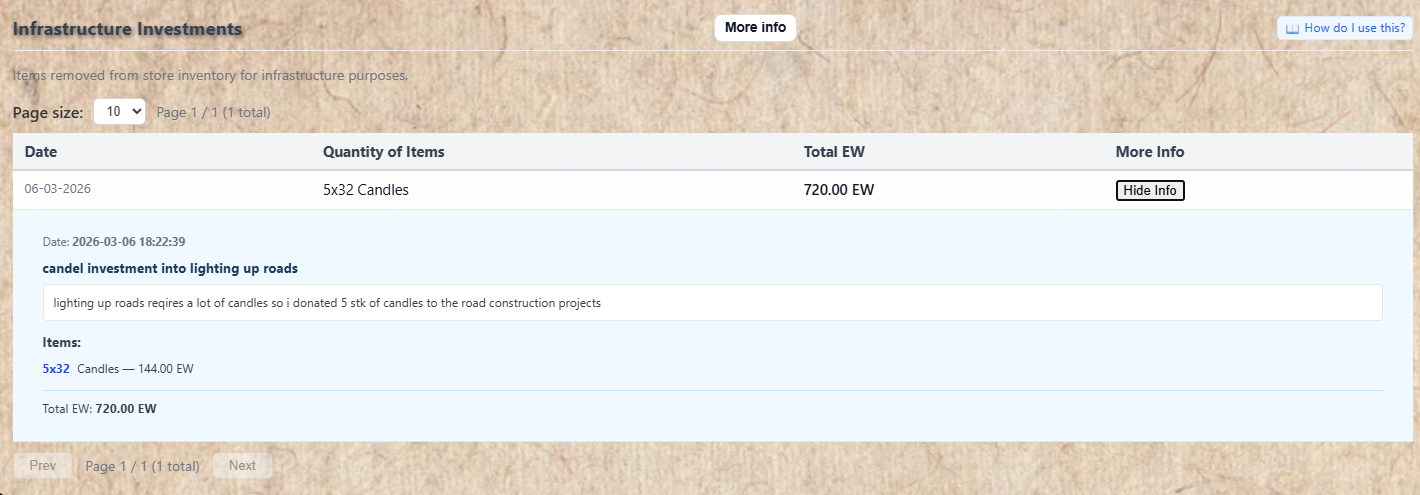
Infrastructure Investments — a transparent record of how store resources were used for infrastructure.
Velocity & Inflation
This section tracks two related things: how active trading is (velocity) and how prices are changing over time (inflation).
Inflation Index: Tracks price changes relative to a starting base of 100. If the index is at 120, average prices are 20% higher than the baseline period.
Use the Category dropdown to choose: Median (all items), Metals only, Common items, or Selected items (you pick them).
Velocity per item: Daily trading activity for individual items. Use the Velocity metric dropdown to choose what to measure:
- EW Velocity — total EW value traded per day.
- Store Volume — items bought/sold through the store.
- OCM Volume — items traded on the OCM.
- Unique Traders — how many distinct players traded that item.
- Trade Count — number of individual trades.
Velocity combined: Same metrics but summed across all items.
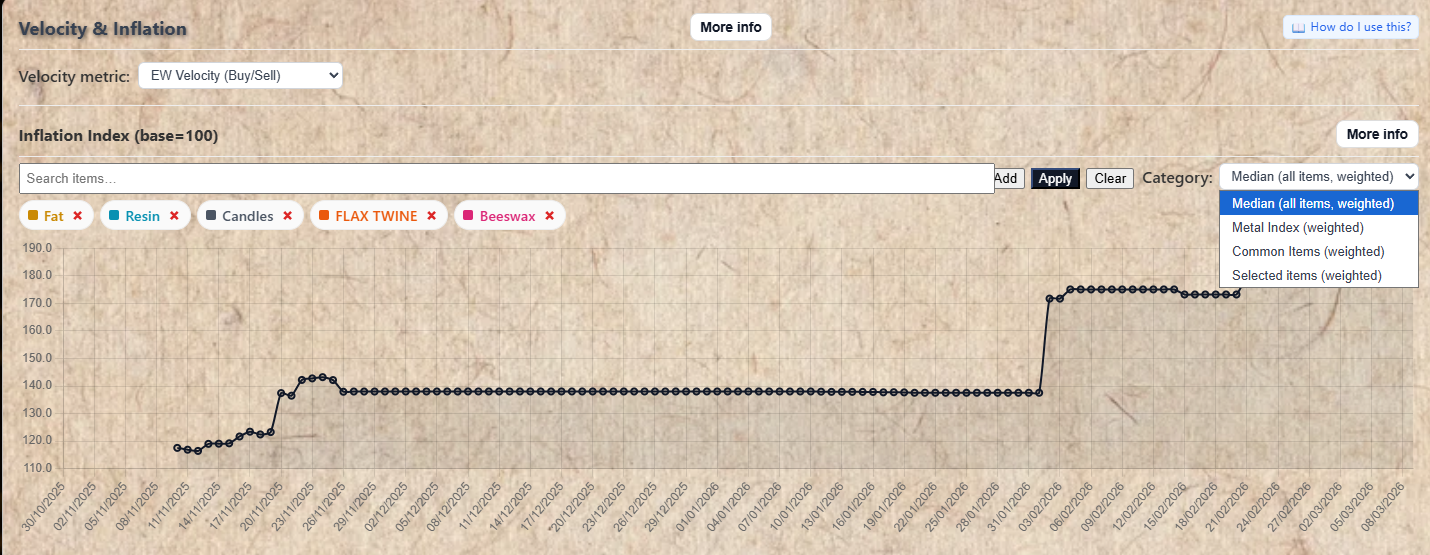
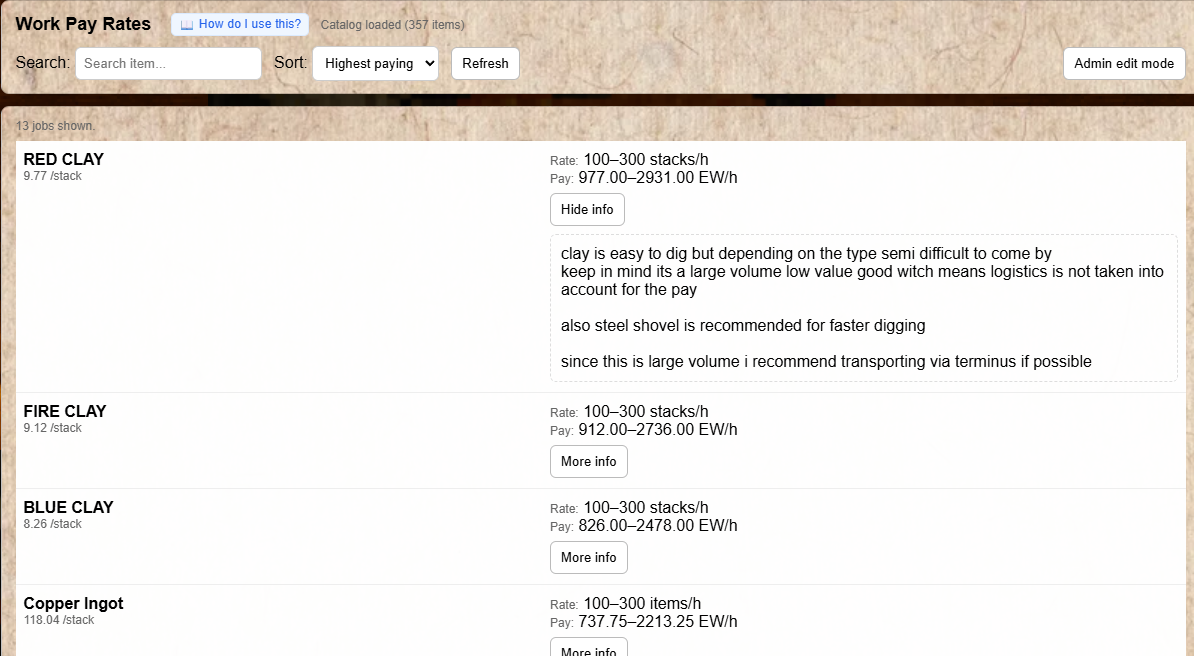
Velocity & Inflation — track trading activity and price trends over time.
Overview
The Price History page shows historical price and volume data for all tracked store items. No login is required. Data updates daily.
Select items to compare, choose a time range, and explore multiple charts showing price trends, stock levels, inflation, and trade velocity.
Selecting Items
- Type an item name in the Items search box.
- Select the item from the suggestions.
- Click Add — a colored chip appears for the item.
- Add more items if you want to compare them.
- Click Apply to update all charts.
Remove an item by clicking the × on its chip, then click Apply again.
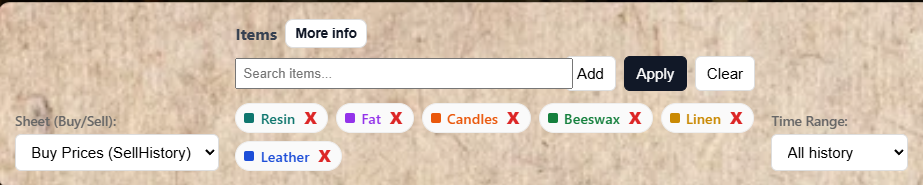
Add items using the search box — each item gets a colored chip and a matching line on all charts.
Buy vs Sell Sheet Selector
The Sheet (Buy/Sell) dropdown controls which price direction is shown on the charts.
Note on the labeling: The names may seem backwards at first. Here's what they mean:
Buy Prices (SellHistory) = prices the store charges you when you buy from it.
Sell Prices (BuyHistory) = prices the store pays you when you sell to it.
The naming comes from the store's perspective: "SellHistory" is what the store sold (to customers); "BuyHistory" is what the store bought (from players).
Price Trend Chart
Shows the historical price of your selected items over time. Each item is a separate colored line.
- Show combined — adds an average line across all selected items.
- Normalize combined to 100 — rescales the combined line to start at 100.
- Normalize all to 100 — rescales every item to start at 100 so you can compare percentage changes regardless of their absolute price.
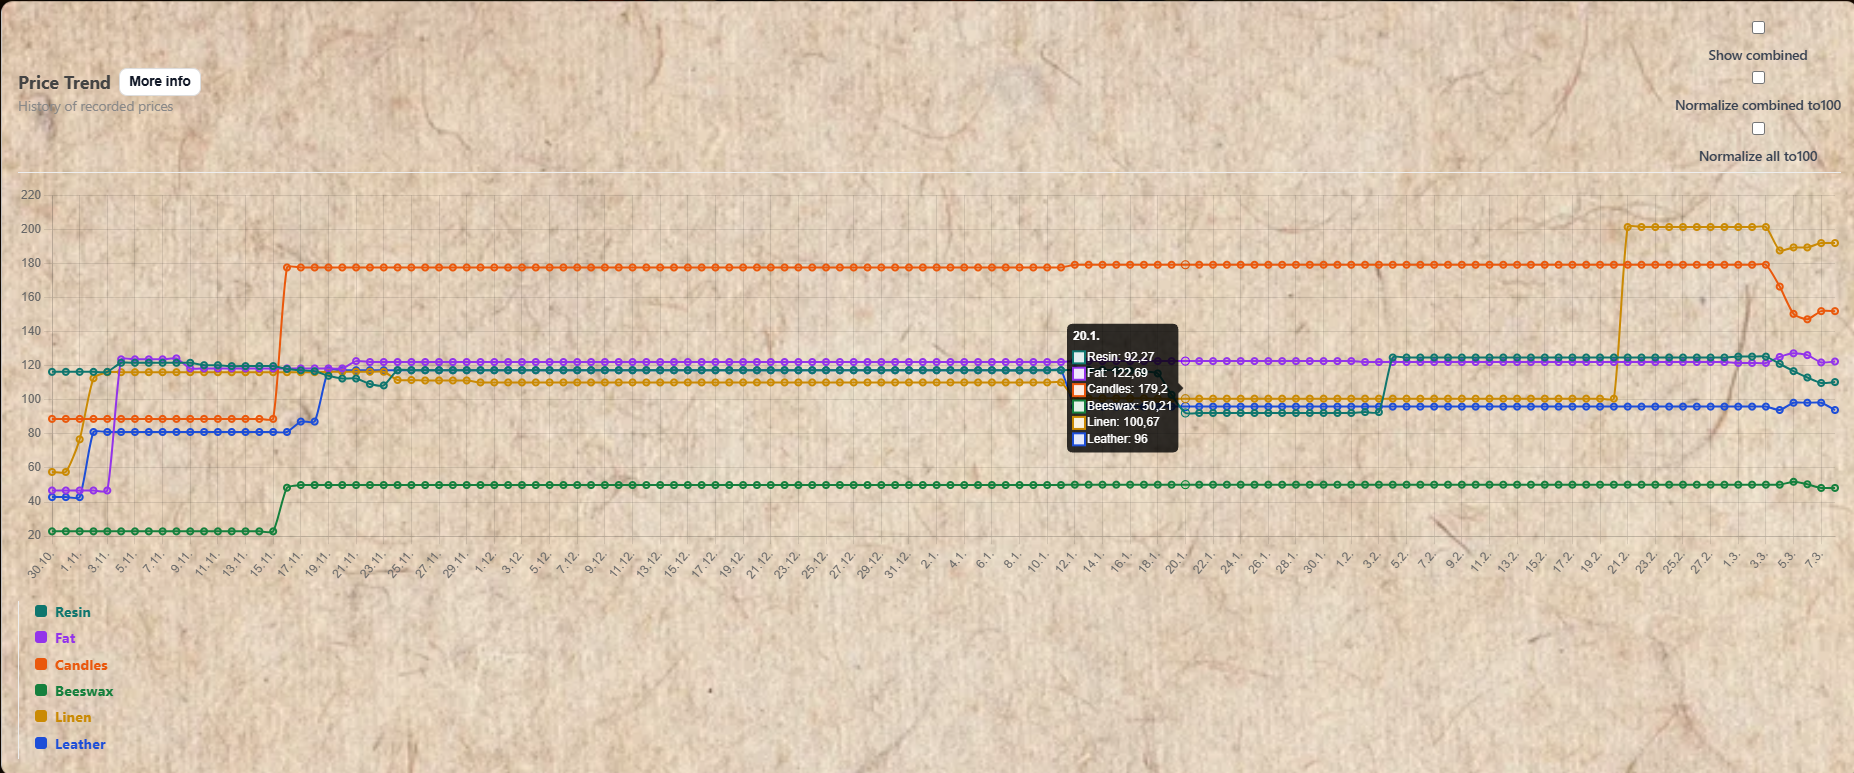
Price Trend — compare historical prices for multiple items on the same chart.
Middle Chart & Metrics
The middle chart can display several different metrics. Use the Middle Chart Metric dropdown:
- Stock Amount — how many of the item the store currently has in stock.
- Daily Price Change (+/-) — raw EW change per day.
- Daily Price Change (%) — percentage price change per day.
- Total Valuation — total EW value of all stock of that item (quantity × price).
- Goal Stock % — how close the store is to its target stock level for that item.
- Target Stock Stack — the store's desired stock level in stacks.
Inflation Index Chart
Shows overall price inflation indexed to a base of 100. When the index is at 120, average prices in that category are 20% higher than the base period.
Use the Inflation Index Category dropdown:
- Median — weighted average across all tracked items.
- Metal Index — metals only.
- Common Items — frequently traded non-metal items.
- Selected items — only the items you have added via the search.
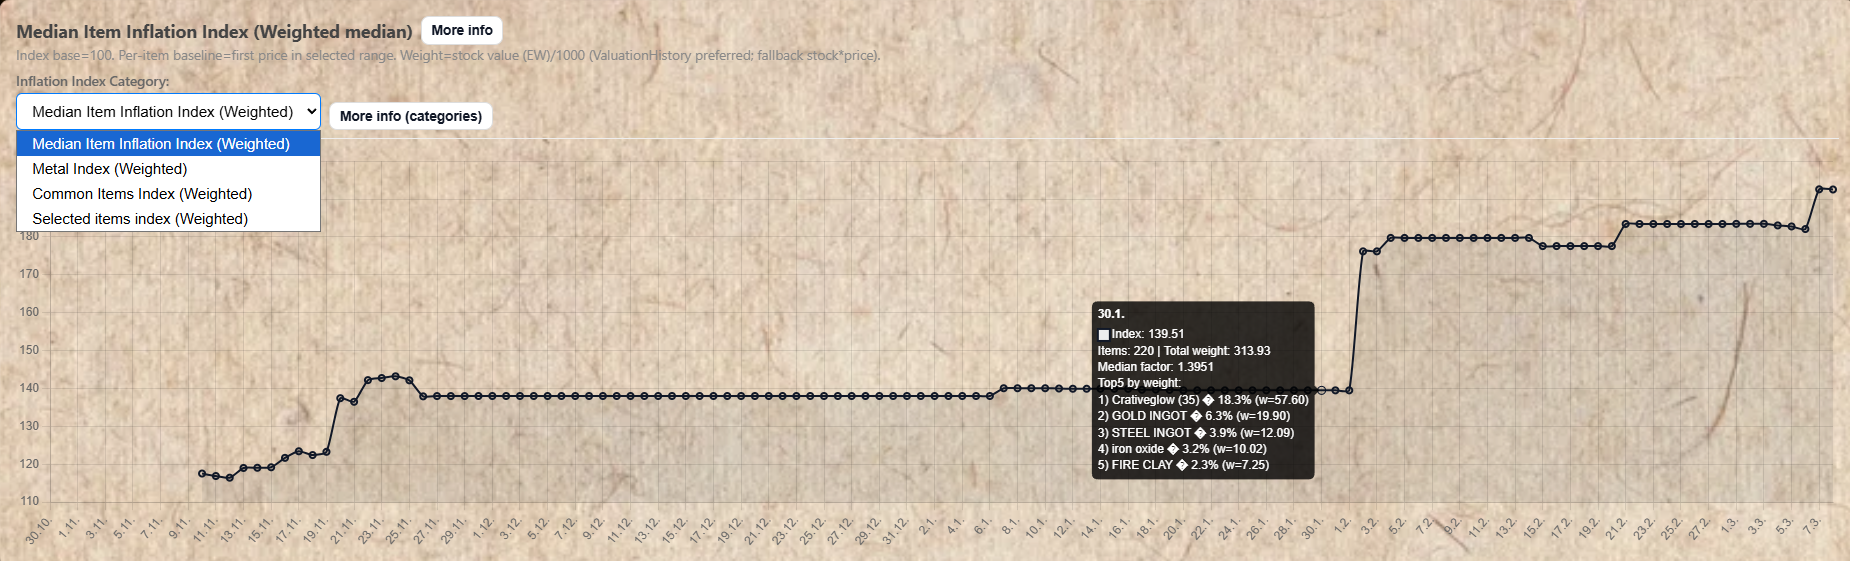
Inflation Index — tracks how prices change over time relative to a base of 100.
Velocity Charts
Two velocity charts are available — per item and combined (all items summed).
Use the Velocity Metric dropdown to choose what to display (EW Velocity, Store Volume, OCM Volume, Unique Traders, Trade Count).
- Show breakdown — splits the metric into sub-components (e.g. Buy vs Sell separately).
- Show A / Show B — toggle each sub-component independently.
- Normalize to 100 — rescales all items to the same baseline for comparison.
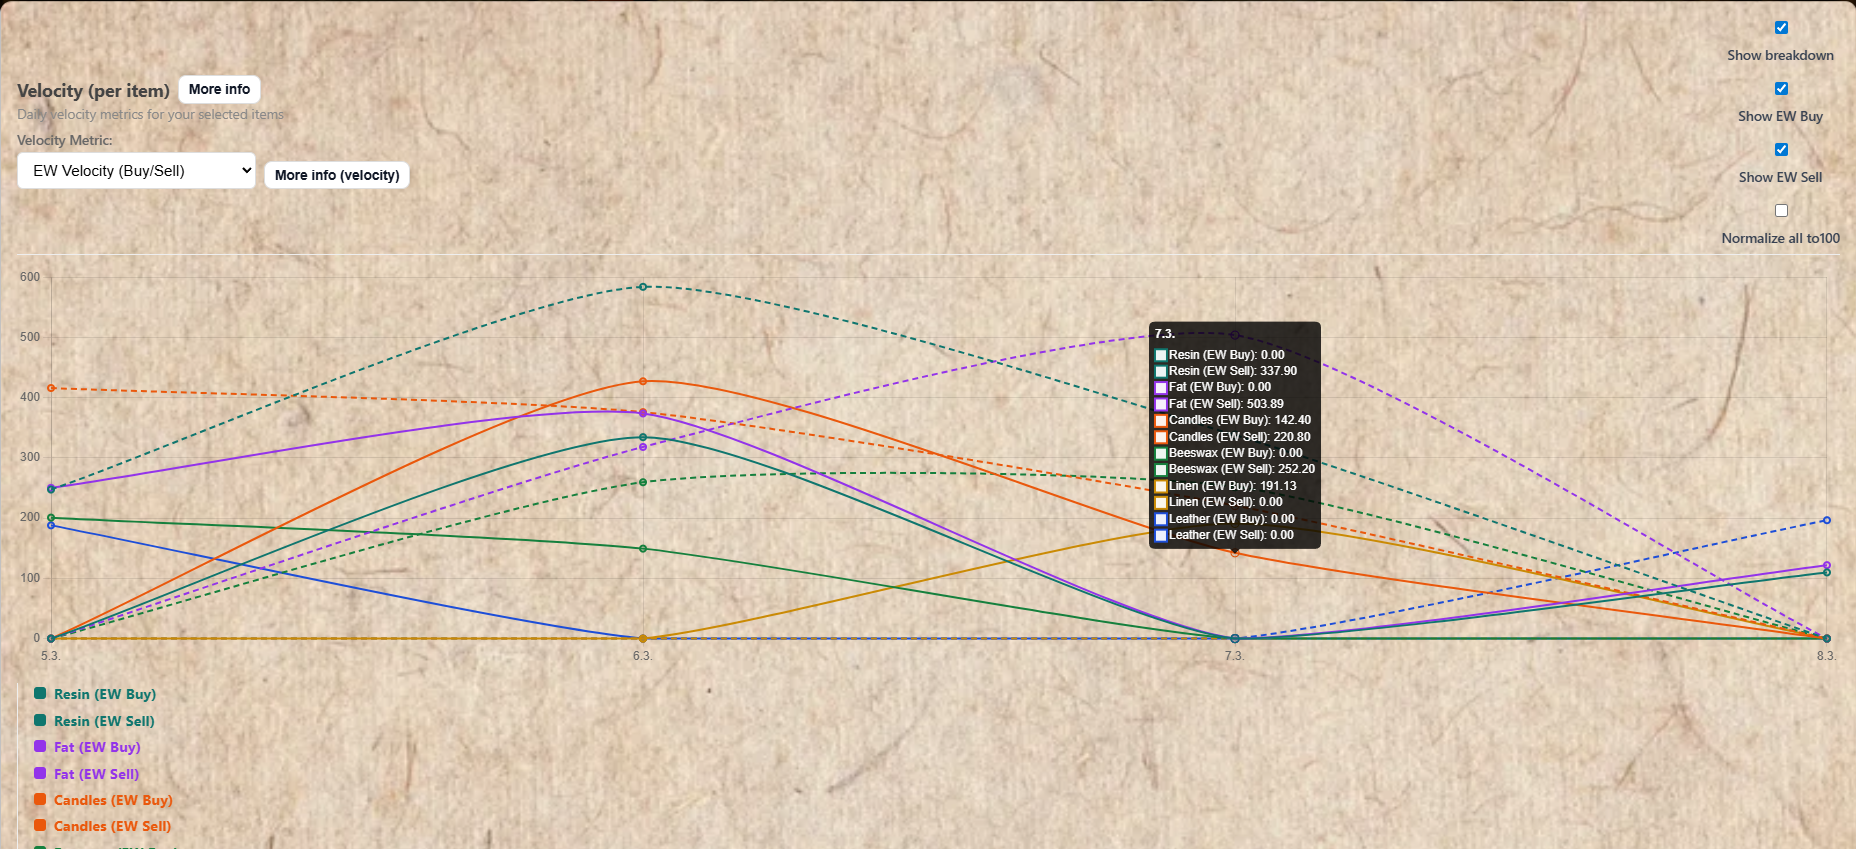
Velocity charts — how actively each item is being traded each day.